

Data types are very important for correctly storing information in database tables. In this article, we’ll demonstrate how to choose and implement the right data types for the database you’re designing in Vertabelo.
When designing a new database or adding tables to an existing database, it’s essential to choose the right data types; they’ll help you run the right queries, functions, and transformations on your data. Well-chosen database data types will also ensure queries have the best performance.
Choosing the right data types for your database means taking advantage of compression algorithms, which can make your database smaller. Not only does this make your database less bulky, but it also reduces the size of your backups. This translates into shorter database restoration times in a disaster recovery scenario.
Finally, selecting the correct data types provides a constraint against junk data, e.g. getting text in a column where you would expect only numbers.
You’ll need to spend time thinking about which database data types you use, but as you can see, there are benefits to spending this extra time.
Before we get started with data types, let’s have a quick review of how to model databases in Vertabelo. If you’re already familiar with data modeling and using Vertabelo to create ER diagrams, you can skip to the ER Diagram Data Types section.
An Introduction to Data Modeling in Vertabelo
An Entity-Relationship diagram (ERD) is a popular way to develop data models and document database schemas. Not only do they set out the structure of the database, they can help you find and solve any logic errors that appear during deployment.
There are many benefits to using an ER diagram when making database schema changes, as you can see in Why Do You Need an ER Diagram?. There are multiple online ER diagramming tools available to help you create an ERD. However, a few key modeler features make building ERDs straightforward. For more details, read the article What to Look for in Your ER Diagram Tool.
If this is your first time building an ER diagram, there are some best practices you should follow. And if this is also your first time using Vertabelo, here are some links that you may find useful:
- Getting Started with ER Diagrams in Vertabelo
- How to Implement a Conceptual, Logical, and Physical Data Model in Vertabelo
- Vertabelo Features: Logical Diagrams
- How to Start with Logical Models (Vertabelo Documentation)
- How to Create Physical Diagrams in Vertabelo
ER Diagram Data Types
When you create a physical data model in Vertabelo, you have to choose the target database engine. This step automatically provides the data types available for your chosen database. We will use the PostgreSQL database engine for this article, so we will only be able to select PostgreSQL data types when defining columns.
With that in mind, let’s create our first table, where we will map basic employee data.
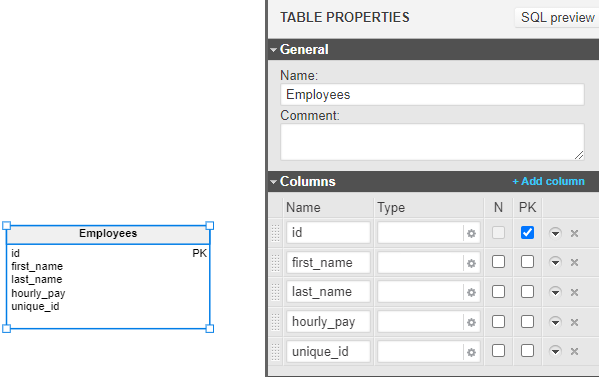
In the above example, we can see a basic Employee table with its columns. When you add a new column, Vertabelo will set its data type to INT (INTEGER) by default. However, I’ve removed the data types from these images so that we start working with a blank slate. Let’s add some data types to these columns!
Open the first_name column’s editor screen by pressing the gear button in the Type field. Here we can select one of our database’s data types. For first_name and last_name, let’s choose a string datatype like VARCHAR and make it 80 characters long:
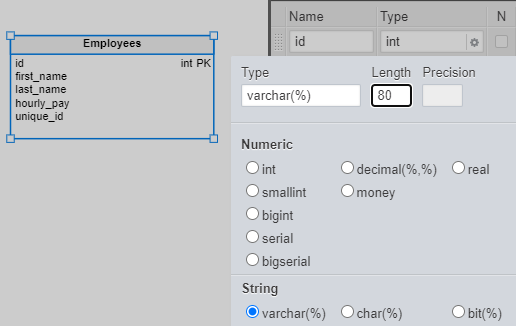
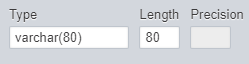
After we add ‘80’ in the Length field, clicking anywhere outside will automatically update the column with that data type definition:
We can follow the same steps for the ID column, choosing INT from the database data types. You will see that there is no length needed to be added to this data type. That’s because INTEGER data types automatically store whole numbers between -2147483648 and +2147483647. I've selected the ID column as the primary key for this table; this will let other tables link to employee records.
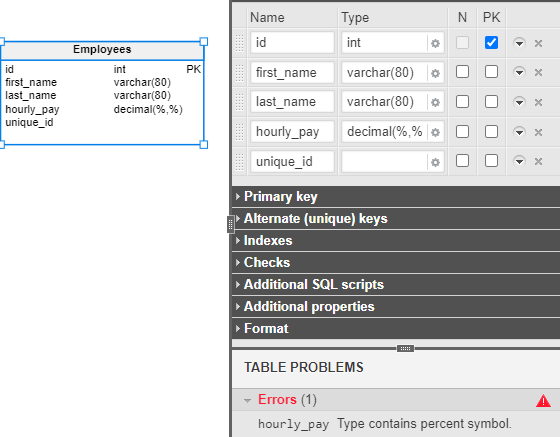
Now, let’s add the data type for the hourly_pay column for the Employees table. Hourly rates for employees range from tens to hundreds of euros. For such a narrow range, we don’t need an INTEGER data type. And because hourly pay rates are not always whole numbers, we need a way to store decimals. This is why we’ll choose the DECIMAL data type.
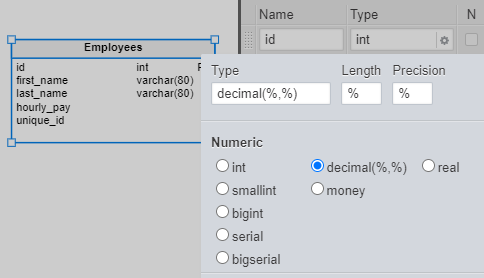
After we select DECIMAL, two new fields are now available: the Length and Precision fields. The automatic “%” values you see in the image are placeholders for the numeric values we need to add in these fields.
These placeholders correspond to two numerical parameters. The first one, Length, defines the maximum number of total digits that can be stored. The second one, Precision, defines the maximum number of decimal digits that can be stored. For example, a column defined as DECIMAL(5, 2) can store numbers between -999.99 and 999.99.
If you forget to add these two values, Vertabelo will display an error message stating that the data type contains incorrect characters.
If you’ve followed the steps up to this point, the table structure should look something like this:
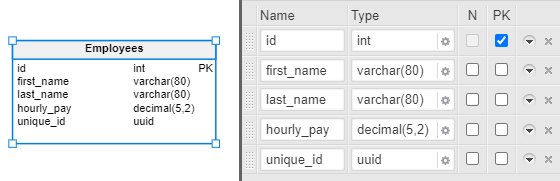
Now, let’s add the data type for the last column, unique_id. The purpose of this column is to generate a universally unique ID (UUID) for the user. UUIDs can be used as the base for generating a QR code for building access (as an example). We’ll be using PostgreSQL’s UUID (Universally Unique Identifier) data type for this field.
If we go into the column settings for the unique_id column, we might look for the UUID data type. But it’s not there! That’s because the Vertabelo modeler by default shows only the most popular database data types in this list. To add UUID as a data type for this column, all we have to do is write the name of the data type in the Type field.
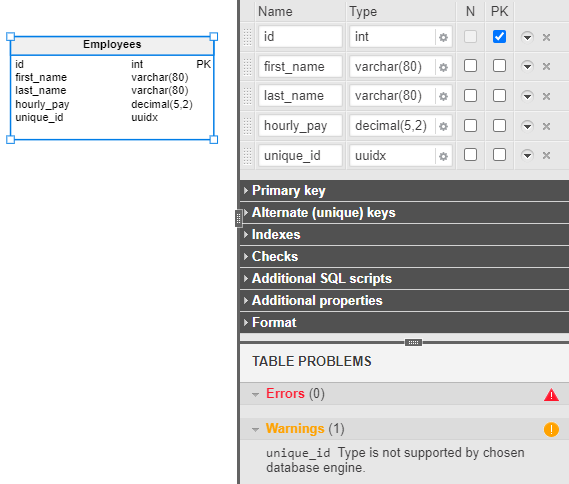
As you can see, I’ve accidentally entered “uuidx” – a data type that does not exist. Fortunately, Vertabelo checks typed-in data to help users avoid typos or errors. It’s given us a warning (in the bottom right) to let us know about a potential problem.
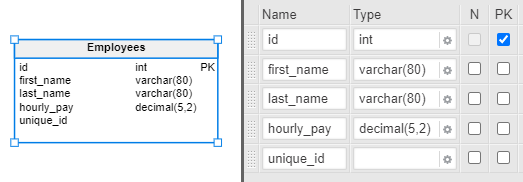
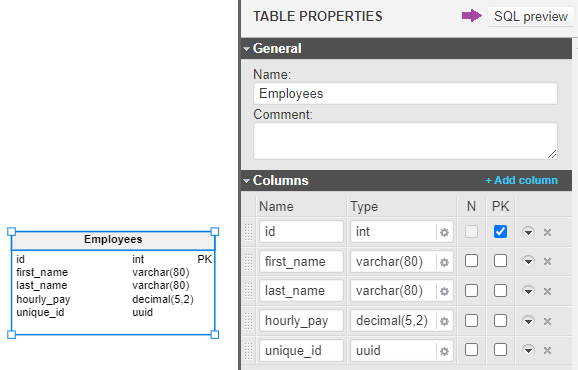
If we go back and correct the data type, we will see the warning message disappear. At this point, our table is complete – we’ve added the correct data types to the columns. If you followed along, your configuration should look like this:
You also have access to advanced column settings, if you ever need them. These settings are collations, checks, and indexes. We’ll consider each of them individually.
Collations
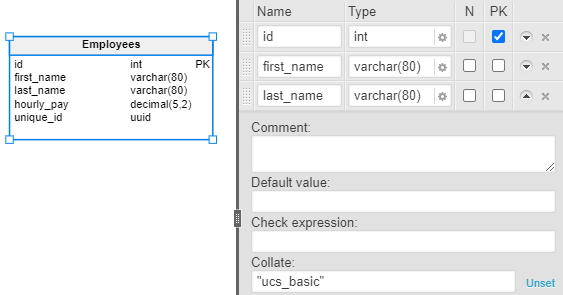
A collation is a setting that can be applied at the database or the column level. It refers to how characters are stored and encoded inside the database. This also has an impact on how data is matched, e.g. when comparing two columns or a column with a fixed value. You can find more details about PostgreSQL collations in this article.
To add a collation to a column, click the “More” button (the downwards triangle) next to the column name. This will expand into a subsection. You can add either a standard collation to that column or a custom collation. We will go with the SQL standard-compliant ucs_basic for UTF-8 encoding.
Checks
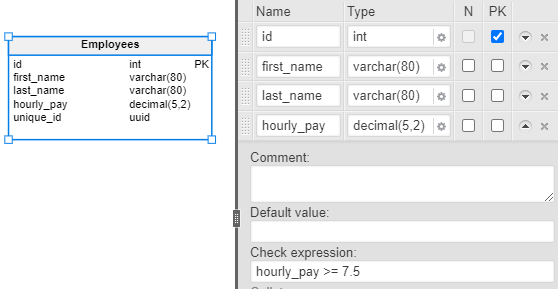
Column checks (also known as CHECK constraints) ensure only values that meet certain conditions are saved in a column when data is inserted or updated.
In our scenario, we can add a CHECK constraint to the hourly_pay column. Since there is often a government-mandated minimum wage, it makes sense that the values stored in this column would be at least equal to that value. So let’s say we want to ensure the values inserted into this column will be 7.50 or more. To do that, we add some criteria into the Check expression field, as shown below:
Indexes
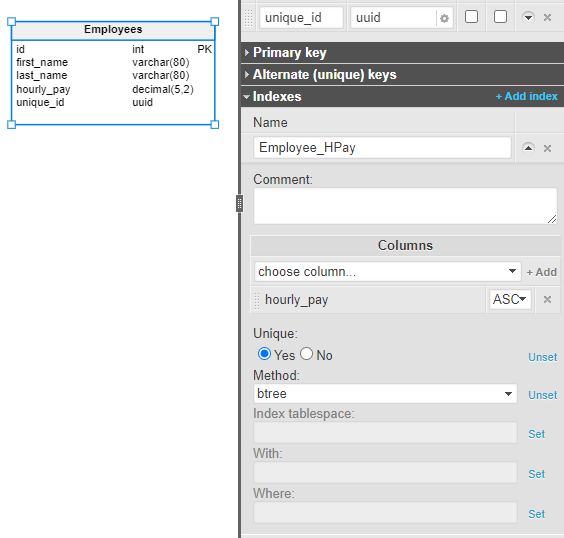
An index not only helps column searches run faster, it can also constrain the inserted data to be unique.
For example, we might want to have a constraint where each employee is paid a unique amount per hour. We can set up this constraint (and also provide a performance boost when filtering by salary) by creating a UNIQUE index. Make sure to Add the columns on which you want the index to be created.
You can always go more in-depth with indexes, especially when your database deals with enormous amounts of data. Understanding indexes and knowing how to create the right index is a real superpower – you can read more about indexes here.
Wrapping Up
Finally, we can click SQL Preview, which is highlighted below, to preview the DDL query for this table.
You should have a pop-up appear with the final output, which should look something like this:

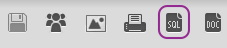
To get the full query for the model, go to the main toolbar and click the SQL button, shown below:
Master Databases and Data Types!
We hope you enjoyed reading this article and that you learned a lot of new things about database data types. And remember, practice is the way to mastery. Practicing building databases, creating ER diagrams, and setting up the right database data types are good habits that will become a solid foundation for any developer.
