

Migrating a database between two different schemas involves serious risks to data integrity and application availability. Read this article to learn data migration best practices and ensure satisfactory results.
Database schemas are constantly evolving. This evolution can be a consequence of many reasons, including version changes in an application that uses the database, refactoring processes to improve database design, or the integration of different applications.
As database designers, we commonly face the challenge of migrating a database to a new schema. This task consists of adapting the database structure to reflect the new schema faithfully – and doing so without losing information or affecting data integrity.
Let’s start by being clear that this is not a task that can be done fully automatically. It involves risks to information integrity and to the applications that use that information. The good news is that there are Data Migration Tools and it's best practices that ensure success in almost any situation – provided you have created your models following the best practices for database modeling. You might want to check some database schema examples if you need ideas to improve your designs. Success is almost guaranteed if you make the right decisions when planning your database migration and you follow the steps carefully.
There are different scenarios in which a database migration can occur, each with different levels of difficulty and risk.
Migrating an Empty Database
This first scenario does not require complicated techniques or great precautions. It occurs in those rare cases where the database is empty or contains only test information that can be discarded.
To be honest, this situation does not even deserve to be called a database migration process; even if the database exists, you can simply delete it and create it again according to the new schema.
Any database modeling tool could be an aid in migrating a database. If you use Vertabelo to design your schema, you can generate the database creation script from the new schema and run it on a new database generated in the target RDBMS. You can do this by opening the ER diagram of the destination schema in Vertabelo and clicking the SQL icon in the main toolbar. Then choose Create and select the appropriate options, as explained in the article How to Generate an SQL Script Creating a Database.
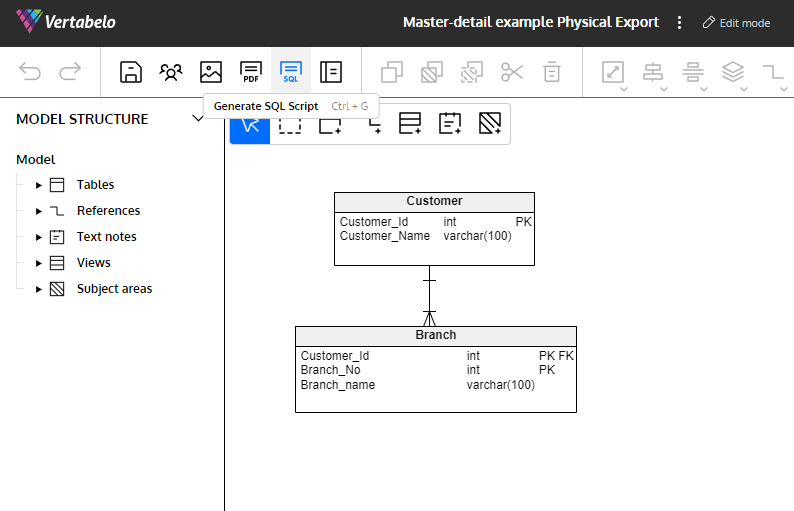
Vertabelo lets you generate a DDL script to generate all the objects in an ERD.
To migrate a database containing information that you need to preserve, other scenarios arise that vary according to the magnitude of the differences between the current database schema – let's call it Schema A – and the new schema, or Schema B.
Determining the Migration Delta
The delta – or difference between two schemas – is the set of changes that you should apply to the database for its schema to transform from A to B. There are no absolute measures to determine whether a delta is large or small, so you need to use rules of thumb and common sense to determine its magnitude.
While there are always exceptions and each designer may have their own criteria, a small delta usually involves no more than 10 tables in the schema – whether they are new, modified, or deleted.
The best way to accurately determine the delta between two versions of a database schema migration is to compare the entity-relationship diagrams of both versions. In case you don’t have an ERD that accurately represents the current version of the database, you can obtain one by reverse engineering the database. You can use Vertabelo’s reverse engineering tool to do this, following the instructions in the tool’s documentation.
As a result of comparing the two schema versions, you will know which objects need to be added, deleted, or modified from Schema A to Schema B.
Although you can make the comparison visually, it is preferable to compare the schemas using an automated tool that renders an unambiguous delta between the schemas – either in the form of a list of changes or a SQL-DDL (Data Definition Language) script that can be run on the database to adapt its structure. If the tool renders a DDL script, that will be the initial version of your migration script, which is possibly the most important element of any migration process. Automating the process in this way helps you avoid errors or omissions.
Deciding on the Migration Strategy
Once you have compared the two schemas and determined the delta between them – either in the form of a script or a list of changes – you need to make a crucial decision: Which migration path will you choose?
At this point, you will decide between two possible paths:
- In-place upgrade: Make all the modifications directly on the existing Schema A database to bring it in line with Schema B.
Or:
- Actual migration: Create a new database based on Schema B and incorporate into it the information from the Schema A database.
The migration path you use will depend on the magnitude of the delta and the complexity of applying it. For a small or low complexity delta, the general rule is to modify the existing database. If the delta is large or very complex, it could be preferable to create a new database and migrate the information.
Let’s see what is involved in following each of these paths.
In-Place Upgrade
The small delta situation is usually encountered when a database migration is related to successive releases of an application. In these situations, most designers will apply the migration script to the existing database. Let’s see the steps you will have to follow in this case.
Create the Migration Script
The DDL script, when run on the database to be migrated, will make all necessary modifications to its structure to adapt it to Schema B. You can use Vertabelo to generate this script automatically.
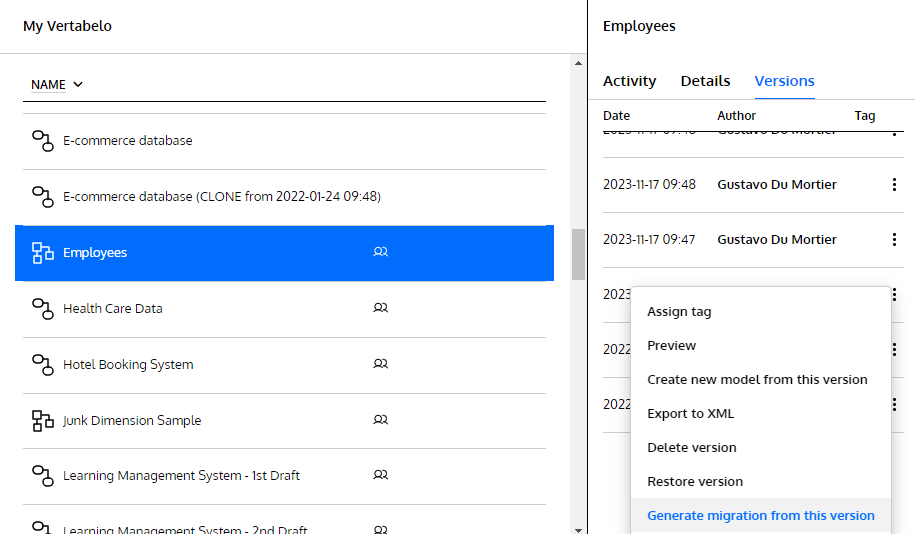
In this example, I have an Employees schema to which I’ve added a Salaries table that’s related to the Employees table. The version history to the right of the screen lets me browse through and preview all autosaved versions:
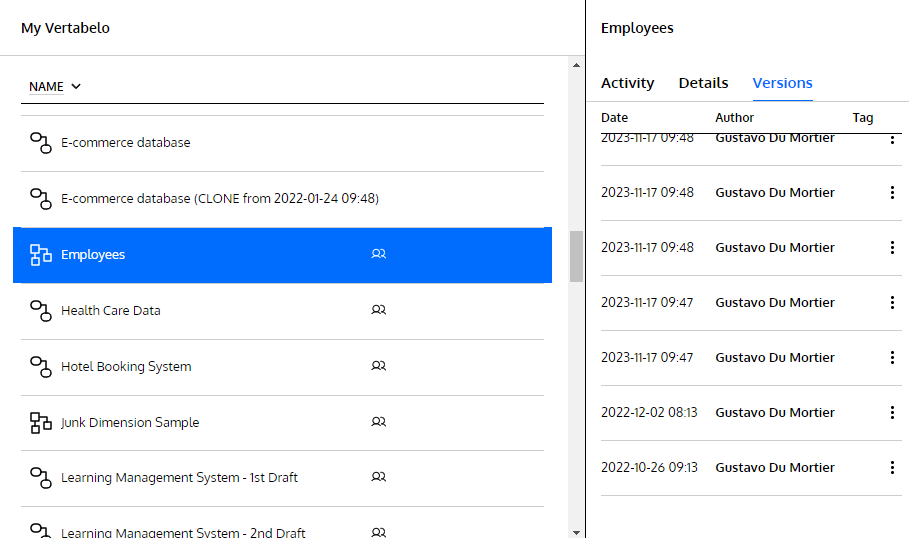
The version list includes the one Vertabelo autosaved just before I added the Salaries table:
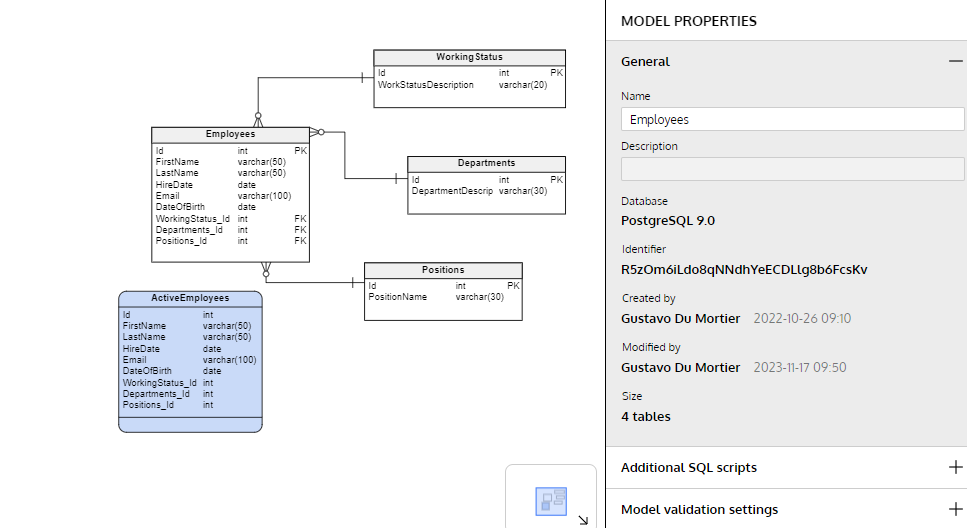
A preview of Schema A: the Employees ERD before adding the Salaries table.
And this is the newest version, including the recently added Salaries table:
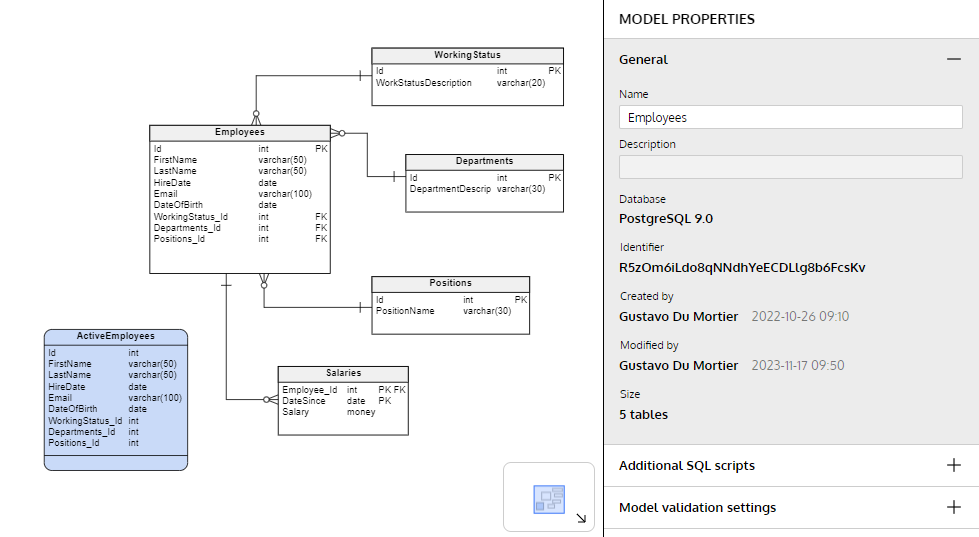
Schema B: the last version of the Employees ERD, including the Salaries table.
When you right-click on the diagram version corresponding to Schema A (or on any version other than the last one), Vertabelo shows an option to generate a migration from the selected version:
Then, Vertabelo shows a list of all your diagrams. You choose the “From” and the “To” to compare them and generate the delta in the form of a migration script:
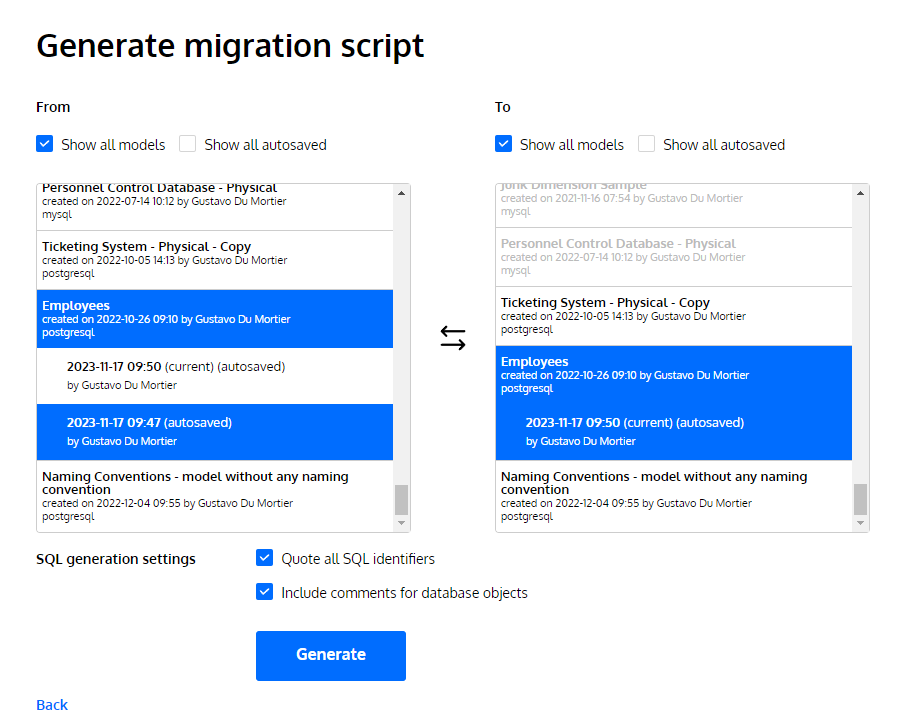
When you click on “Generate”, you will get an SQL migration script – a sequence of DDL commands to create, alter, or delete the objects included in the delta between the two versions of the diagram.
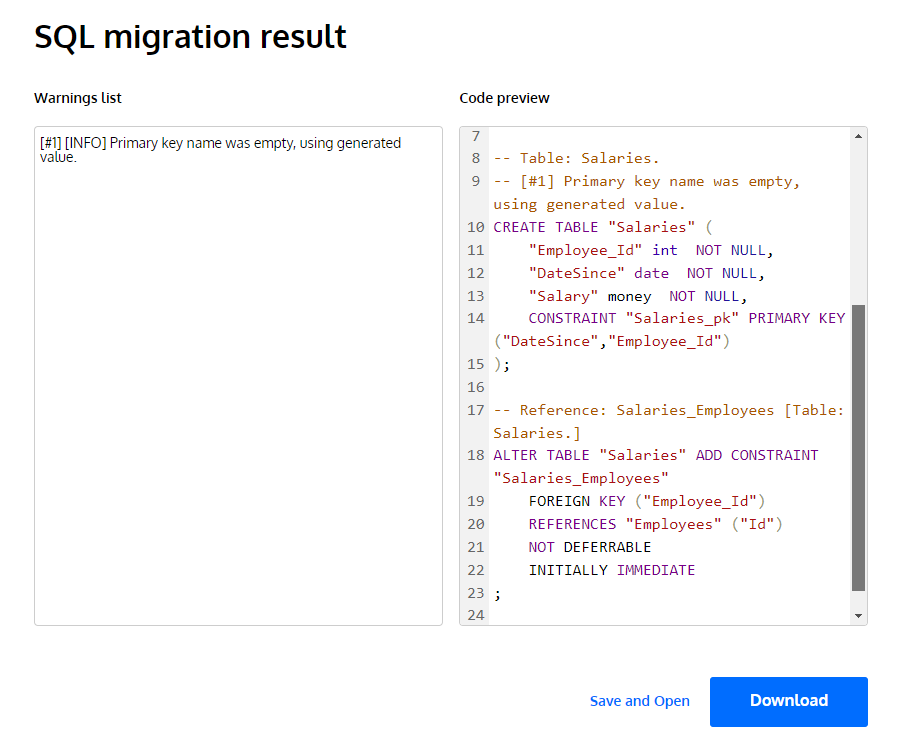
You can download this script as an SQL file and you will have the first version of the migration script. Get more info on creating migration scripts for physical models in this article.
Make Adjustments to the Script
If you are going to work on a database that already has information – and you can’t afford to lose or damage any part of that information – you may need to add DML (data manipulation language) commands to the script to avoid errors. These DML commands commonly involve inserts into new tables or updates of new fields, which will prevent subsequent SQL-DDL commands from being interrupted in the middle of the run due to an integrity violation error, i.e. a primary or foreign key inconsistency.
Following the previous example, let’s suppose you add a Ranks table to the Employees ERD and relate it to a mandatory Rank_id column in the Employees table with a foreign key relation.
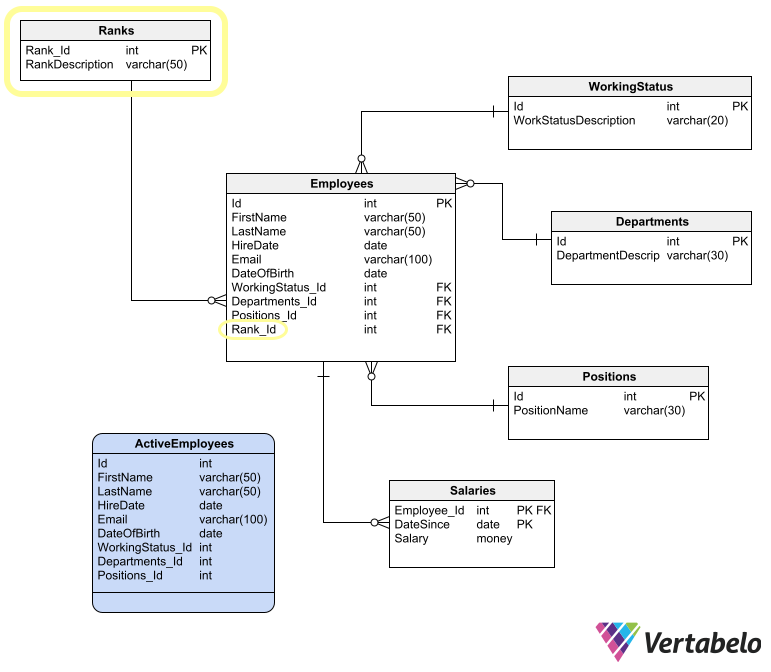
When you generate a migration script for this Schema B, you have to split it in two and manually add some SQL code in between the two halves:
- The first part of the script should create the
Rankstable and add theRank_Idcolumn to theEmployees - In the middle part, you have to manually add SQL code that adds rows to
Ranksand updates theRank_Idcolumn inEmployees. - The last part should create the relation between
EmployeesandRanks.
Choose a Rollback Strategy
A rollback script allows you to easily roll back changes in case something goes wrong – a desirable thing to have. However, creating a reliable rollback script can take as much work (or more) than creating the migration script. If you create a rollback script, you will have to put it to the same tests as the migration script, doubling the total effort required.
That difficulty means that (with few exceptions) it is preferable to rely on other ways of rolling back the migration process. For example, you may choose to enclose the script in a transaction that can be rolled back automatically by the RDBMS. Or you may keep a full database backup that could be easily restored in case of a serious failure during the migration process.
Test the Script
Once you have adjusted the migration script with all the changes needed to transform Schema A into Schema B without problems, you will have to submit it to a testing process.
First, set up a testing environment. This environment must have an identical configuration to the environment where the production database resides: same operating environment, same RDBMS engine, same engine version. In that environment, you should mount a copy of the production database.
Once this is done, you can run your migration script to make sure that it will not cause any errors and will not corrupt or lose information. To make sure that the information in the database is not altered by the migration process, you should have a set of validation queries that yield aggregated results from the tables affected by the migration. You should run those queries before and after running the script and make sure that the results are the same.
If you encounter an error – either reported by the RDBMS when running the script or a difference in the aggregated results – you should make the necessary corrections to your migration script to solve the problems found. Then you update the test environment with a copy of the production database and run the tests again. You must repeat that cycle until you are sure that the script does not cause errors or data loss.
As part of the testing process, you must also perform a set of user acceptance tests – if possible, a set of tests designed by a tester and executed by a key user.
Once you have done these three tests – migration script, validation queries, and user acceptance – it is time to plan the migration of the production database. But first… let’s document.
Document the Script
I know. Nobody wants to do the documentation. But it is an important practice, especially if you don’t have access to the production database and you have to blindly hand the migration script to a DBA who will run it (also blindly) and return the execution results to you.
You could write an instructional document that thoroughly explains all the migration procedures. But it is better if you include the documentation as comments within the script itself. Some advice on this matter:
- If you want the script to be run in a sequence of steps, separate the script into as many files as steps you want to be taken. Name each file very clearly with the step number, e.g. RUN_FIRST.sql, RUN_SECOND_IF_SUCCESS.sql, RUN_THIRD_IF_SUCCESS.sql, and so on.
- If possible, enclose each step in a transaction that can be rolled back in case of failure.
- Include all necessary comments within the SQL code in capital letters and with all the embellishments needed to make sure they are read.
Even if you’ll run the script yourself in the production environment, don’t overlook this documentation practice. Good documentation could relieve your mind of the responsibility of remembering every detail of the migration process.
Migrate the Production Database
The database migration process in the production environment basically consists of the execution of the final script successfully tested in the previous phase. Commonly, only a DBA is authorized to run scripts in production databases. If this is your case, you will have to give the script to the DBA and pray for success. The DBA may allow you the privilege of witnessing the script running on the database. This is a good and desirable thing, since it allows you to supervise the execution and get first-hand feedback.
Depending on the estimated time it takes to execute the script, you should ask the DBA (or the product owner, the key users, or all of them) for a window of time during which no user or application accesses the database. You can determine the size of this window according to the time it has taken to execute the script in the testing environment. Make this estimation generous enough to have a contingency in case something does not go as planned. And don’t forget to include the time to back up the database and restore it if necessary.
Before running the script, it is very important to make a backup of the database and keep it in a safe place. This could also be the DBA’s task or yours, depending on your migration team. If something goes wrong during the execution of the script and you can’t roll it back to leave everything as it was, you’ll have (and need) the backup.
Once you are sure that the database has a backup and that it is in a safe place, you can run the script. If it runs without errors, you should run the same validation queries and user acceptance tests performed during the testing phase. Once all these tests have been passed, you can open the gates for users and applications to start using the migrated database.
What if the migration process fails? Or the validation queries or user acceptance tests do not give the expected results? It can always happen, no matter how much you test. You have to resist the temptation of making adjustments on the fly. That never ends well.
The only way forward in case of trouble is to roll back the changes or recover the production database from the backup and plan a new migration in the future. This decision usually causes disappointment, but it is preferable to making changes “in the heat of the moment” and trying to apply patches that haven’t gone through a testing process – which usually generates more problems than it solves.
Actual Database Migration
The migration process we covered so far is best when the delta between Schema A and Schema B is small and simple. But if the delta is large or complex, the safest way to migrate the database will be to create an empty database according to Schema B and migrate the data from the original database. A large delta is commonly encountered in scenarios such as the integration of two databases corresponding to different applications, or the migration of a database to a completely redesigned schema.
The process required for this scenario is simpler – in the sense that you don’t have to compare databases, generate a script that applies the delta, and make adjustments to the script so that it doesn’t break the data. All the complexity in this type of migration process lies in transporting data from the old database to the new one. Let’s see what this process is about.
Create the Migration Script
You will actually need two scripts to migrate your database to a new one:
- One script to create the database following Schema B, with all empty tables.
- Another script to migrate the data.
The database creation script can be obtained in the same way as we migrate an empty database: using the SQL button in Vertabelo’s main toolbar. Since you will create the empty database, it is almost certain that the script will run without errors – as long as you correctly choose the target RDBMS when generating it.
The data migration script, on the other hand, requires a lot of work and testing effort. It also requires a functional knowledge of the information stored in the database. To write this script, it is also desirable to have a functional knowledge of the applications that use the database.
The order in which data should be migrated depends on the foreign key relationships of each table. First, you have to transfer data to the tables that do not have foreign keys – that is, those tables in which none of their attributes is a primary key of any other table. After that, you start transferring data to the tables for which all related tables have already been populated.
For example, if you have to populate a newly created database from the Employees schema from above, you should first transfer data for these tables:
- WorkingStatus
- Departments
- Positions
These three tables don’t have foreign keys, so their data can be safely migrated. After populating those three tables, you can transfer data for the Employees table, and lastly, for the Salaries table.
If Schema A doesn’t have the same integrity constraints as Schema B, then you have to be prepared to encounter data that violates constraints in Schema B. A good practice to solve this situation is to:
- Move all inconsistent data to a different database or repository.
- Filter out all data that violates Schema B constraints.
- Transfer only consistent information.
Filtered-out data should be reviewed after the migration, in order to decide what to do with it.
Test the Scripts
To test the script that creates the database, you have to run it on an empty database. To verify that the script did what it should, you can generate an ERD by reverse engineering the newly created database. The schema obtained in this way should be equal to Schema B. If not, you should check the database creation script.
To test the data migration script, you have to run it on a testing environment containing the source database (Schema A) and the destination database (Schema B). If something goes wrong with this run, you can simply throw away the destination database, create it again with the first script, make the necessary corrections to the second script, and run it again. The testing task will finish once the data migration script runs without errors and the new database passes the validation queries and the user acceptance tests.
Migrate the Production Database
The fact that the destination database is not yet productive reduces the risks involved in migrating the production database. But still, you must reserve a window of time for the migration process; no new information should enter the source database while you are transferring data to the destination database.
The final step is the same as for the in-place migration: run the validation queries and acceptance tests to make sure the data migration was successful. If not, reschedule the migration for a future time and go back to the development and testing phases.
Ready for Database Migration?
We’ve seen the most important decisions you need to make when putting together a database migration strategy. And we’ve reviewed the necessary steps to carry it out successfully. Now it’s your turn to put together your migration plan, execute it smoothly, and get a medal (or at least verbal congratulations) for a successful database migration.
The final test that will tell you if your migration was truly successful is to ask users how the migration went. If users look at you in confusion and ask: "Migration? What migration?", then your job was well done.
