

In this article, we’ll use the Vertabelo online data modeler to design a data model for an inventory management system.
Do you need to create and implement a database for an inventory management system? In this article, we’ll walk you through a generic inventory management system database model. No two organizations are the same; they all have their unique requirements and needs. So, this database design may require adjustments or modifications based on your own organization requirements, preferred inventory counting method, and your local legal or industry regulations.
To build our entity-relationship diagram, we’ll use the Vertabelo online data modeling tool. Vertabelo allows database architects and developers to design and implement a database model, starting with a conceptual or logical data model and converting it into a physical model. It will also automatically create all the required SQL scripts to implement your design in a physical database. If you want to learn more about ER diagrams, read What Is an ER Diagram? and What Are Conceptual, Logical, and Physical Data Models?.
Inventory Management System Requirements
The most important feature of any inventory management system is to provide up-to-date information about inventory levels. This allows organizations to reduce costs (by minimizing overstocking) while maintaining customer satisfaction by ensuring prompt deliveries and reducing out of stock situations. For organizations with multiple stores, a good inventory management system allows for central control, making it easier to manage and optimize stock levels at all locations.
To achieve this, the system must track both existing inventory levels and all operations that affect them, like purchase orders sent to providers and customers’ delivery orders. This will become clear as we go on. Let’s review the different entities involved, their attributes, and their relationships. We’ll start by creating and filling a logical data model. You can learn how easy it is to create a database model on Vertabelo in Create an Online Data Model in 4 Steps.
Creating an Empty Model
Creating a new logical data model in Vertabelo can be done in three simple steps:
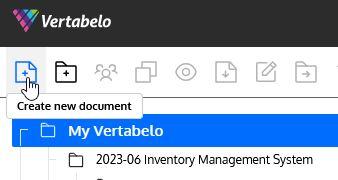
- Click the “Create New Document” button in the main menu:
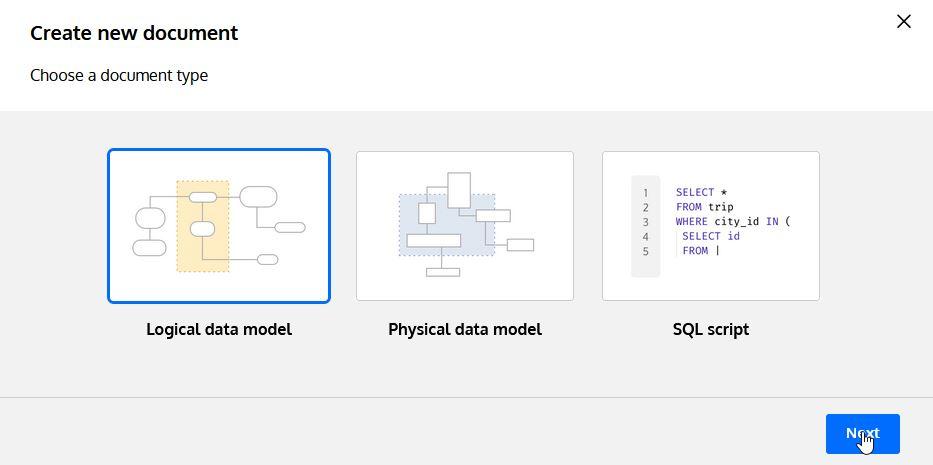
- Select the desired model type and click “Next”:
- Provide a name for the model and click “Start Modeling”:

Adding Inventory Management System Entities
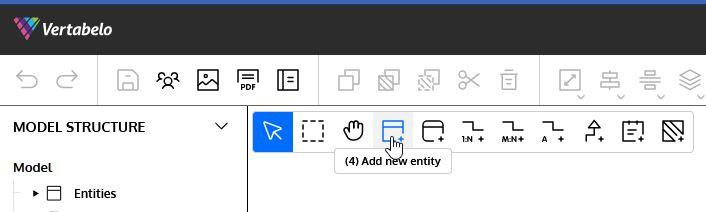
Next, let’s add the entities in our system. Entities are added by clicking on the “Add new entity” button in the model toolbar:
A database model for inventory management system should have the following entities:
Product
Products are the starting point for designing our system. Each industry or business line will have different product attributes (e.g. clothes have material, size, and color, while cars have color, trim level, engine type, etc.). In this article, we’ll focus on those attributes required to create our database model rather than specific attributes required for sales or other activities.
We can group product attributes into two subsets: generic attributes and storage attributes. Let’s start with the generic attributes for the Product entity:
ProductID: This will be a unique ID number and the primary identifier (later the surrogate primary key) of the entity. We will use an INTEGER If you want to learn more about primary identifiers and additional identifiers (which become unique keys), read the article What Is a Primary Key?.ProductCode: Besides theProductID, products are usually identified by an internal code (also called an SKU or Stock Keeping Unit). This code consists of letters and numbers that identify characteristics about each product, such as manufacturer, brand, style, color, and size. This is also an additional identifier. We will use a VARCHAR(100) datatype for this attribute.Barcode: This external product code (also known as the UPC or Universal Product Code) is standardized for universal use by any company. We will use a VARCHAR(100) datatype.ProductName: The product’s n We will use a VARCHAR(100) datatype.ProductDescription: A more detailed description of the product. We will use a VARCHAR(2000) datatype.ProductCategory: The product’s category. We will use a VARCHAR(100) datatype.ReorderQuantity: Some products cannot be ordered by units; you need to purchase them in packages or We will use the INTEGER datatype.
Note: ProductCategory could (and should) be normalized (stored in a separate entity). To keep the model simple, we are using a denormalized version. To learn about normalization in database models, take a look at the article Normalization in Relational Databases.
Let’s finish the review with the storage attributes for the Product entity; these determine how to store the products. Some examples are:
PackedWeight: Product’s weight, including packaging. This may be required to define storage location. We will use the DECIMAL(10,2)PackedHeight: Product’s height, including packaging. This may be required to define storage location. We will use the DECIMAL(10,2)PackedWidth: Product’s width, including packaging. This may be required to define storage location. We will use the DECIMAL(10,2)PackedDepth: Product’s depth, including packaging. This may be required to define storage location. We will use the DECIMAL(10,2)Refrigerated: Indicates if the product requires refrigeration. We will use a BOOLEAN
Location
This entity has the information related to places where inventory is located. Many organizations have several locations, and each location includes one or more warehouses with different features. Location attributes are:
LocationID: This will be a unique ID number and the primary identifier (later the surrogate primary key) of the entity. We will use an INTEGER datatype.LocationName: The name of the location. We will use a VARCHAR(100) datatype.LocationAddress: The full address of the location. We will use a VARCHAR(200) datatype.
Note: Location addresses could (and should) be normalized into several attributes (e.g. Address, City, PostalCode) and tables (PostalCodes, Cities, States, and Countries). To keep the model simple, we are using a denormalized version.
Warehouse
This entity represents the actual storage area inside a Location. It has the following basic attributes:
WarehouseID: This will be a unique ID number and primary identifier (later the surrogate primary key) of the entity. We will use an INTEGER datatype.WarehouseName: The name of the w We will use a VARCHAR(100) datatype.IsRefrigerated: This attribute indicates if the warehouse has refrigeration. We will use a BOOLEAN data type.
Note #1: Each Warehouse is related to a Location. We will see how to create those relationships later in this article.
Note #2: Additional attributes (like the dimensions and capacity of each warehouse) may be added if required.
Inventory
This entity represents the relationship between products and warehouses. Each product may exist in several Warehouses, and each warehouse may contain many different products. Besides the relationship, we need to store additional data (like the quantity of that product available), so we are going to create an entity that represents this relationship. The basic attributes are:
InventoryID: This will be a unique ID number and the primary identifier (later the surrogate primary key) of the entity. We will use an INTEGER datatype.QuantityAvailable: The quantity on hand for that We will use an INTEGER datatype.MinimumStockLevel: The minimum number of units required to ensure no shortages occur at this warehouse. We will use an INTEGERMaximumStockLevel: The maximum number of units desired in stock, i.e. to avoid overstocking. We will use an INTEGERReorderPoint: When the number of product units reaches this level, a purchase order must be generated. This threshold is somewhere between the minimum and maximum levels and should take into account the time between sending a purchase order and the new products’ arrival to avoid getting under theMinimumStockLevel. We will use an INTEGER
Note #1: Each Inventory is related to a Warehouse and a Product. We will see how to create those relationships later in this article.
Note #2: MinimumStockLevel, MaximumStockLevel, and ReorderPoint can be defined at the Product or Warehouse level (as we decided here), depending on requirements.
Note #3: Depending on the size of the warehouses and the diversity of their products, additional information for locating the product in the warehouse may be required (like sector, row, shelf, etc.).
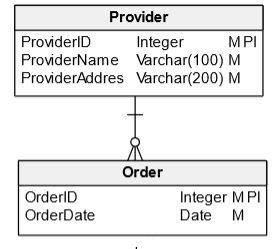
Provider
Organizations purchase products from providers, so we need to store some basic information about these providers. We will focus only on those attributes required for inventory management:
ProviderID: This will be a unique ID number and the primary identifier (later the surrogate primary key) of the entity. We will use an INTEGER datatype.ProviderName: The provider’s We will use a VARCHAR(100) datatype.ProviderAddress: The provider’s full We will use a VARCHAR(200) datatype.
Note: Provider addresses could (and should) be normalized into several attributes, as we explained for location addresses.
Order & OrderDetail
When companies purchase products from a provider, they include information about the places (warehouses) where the products will be stored and quantities that need to be delivered. This information is stored in the following two entities.
Order
OrderID: This will be a unique ID number and the primary identifier (later the surrogate primary key) of the entity. We will use an INTEGER datatype.OrderDate: This is the date when the order was generated.
OrderDetail
OrderDetailID: This will be a unique ID number and the primary identifier (later the surrogate primary key) of the entity. We will use an INTEGER datatype.OrderQuantity: The amount of a specific product ordered for a specific w We will use an INTEGER datatype.ExpectedDate: The date when the products should arrive at the w We will use a DATE datatype.ActualDate: The date when the products were received by the w We will use a DATE datatype.
Note #1: Each Order is related to a Provider and may include several OrderDetails. Each of them represents the expected quantity of a Product in a Warehouse. We will see how to create those relationships later in this article.
Note #2: We are focusing only on inventory information. We are not considering other details like price, taxes, etc.
Customer
Organizations sell products to their customers, so we need to store some basic information about customers. As with Provider, we will focus only on those attributes required for inventory management:
CustomerID: This will be a unique ID number and the primary identifier (later the surrogate primary key) of the entity. We will use an INTEGER datatype.CustomerName: The customer’s We will use a VARCHAR(100) datatype.CustomerAddress: The customer’s full address. We will use a VARCHAR(200) datatype. As with other addresses we’ve presented, this could (and should) be normalized into several attributes.
Delivery & DeliveryDetail
Once we sell products to a customer, the inventory management system generates a delivery request. It may include different products from different warehouses, depending on products’ availability and warehouses’ proximity to the customer’s address. This information is stored in the following two entities.
Delivery
DeliveryID: This will be a unique ID number and the primary identifier (later the surrogate primary key) of the entity. We will use an INTEGER datatype.SalesDate: This is the date when the sale was made and the delivery request was generated.
DeliveryDetail
DeliveryDetailID: This will be a unique ID number and the primary identifier (later the surrogate primary key) of the entity. We will use an INTEGER datatype.DeliveryQuantity: The amount of a specific product to be delivered from a specific w We will use an INTEGER datatype.ExpectedDate: This is the date when the products should arrive at the customer’s address. We will use a DATE datatype.ActualDate: This is the date when the products were delivered. We will use a DATE datatype.
Note #1: Each Delivery request is related to a Customer and may include several DeliveryDetails. Each of them represents the expected quantity of a Product to be sent from each Warehouse. We will see how to create those relationships later in this article.
Note #2: We are focusing only on inventory information. We are not considering other details like price, taxes, etc.
Transfer
There are situations when some products need to be transferred from one warehouse to another. This kind of operation is registered as a Transfer with the following attributes:
TransferID: This will be a unique ID number and the primary identifier (later the surrogate primary key) of the entity. We will use an INTEGER datatype.TransferQuantity: How much of a specific Product has been transferred from one warehouse to another w We will use an INTEGER datatype.SentDate: This is the date when the products left the source w We will use a DATE datatype.ReceivedDate: This is the date when the products arrived at the target w We will use a DATE datatype. This attribute will accept NULLs, since this piece of information is not available at the moment the transfer is generated.
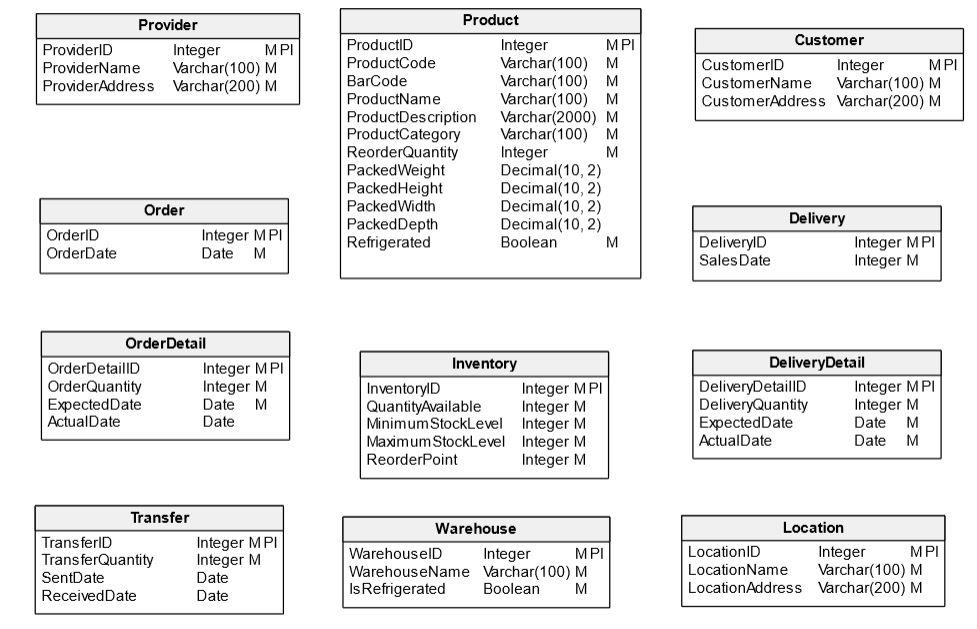
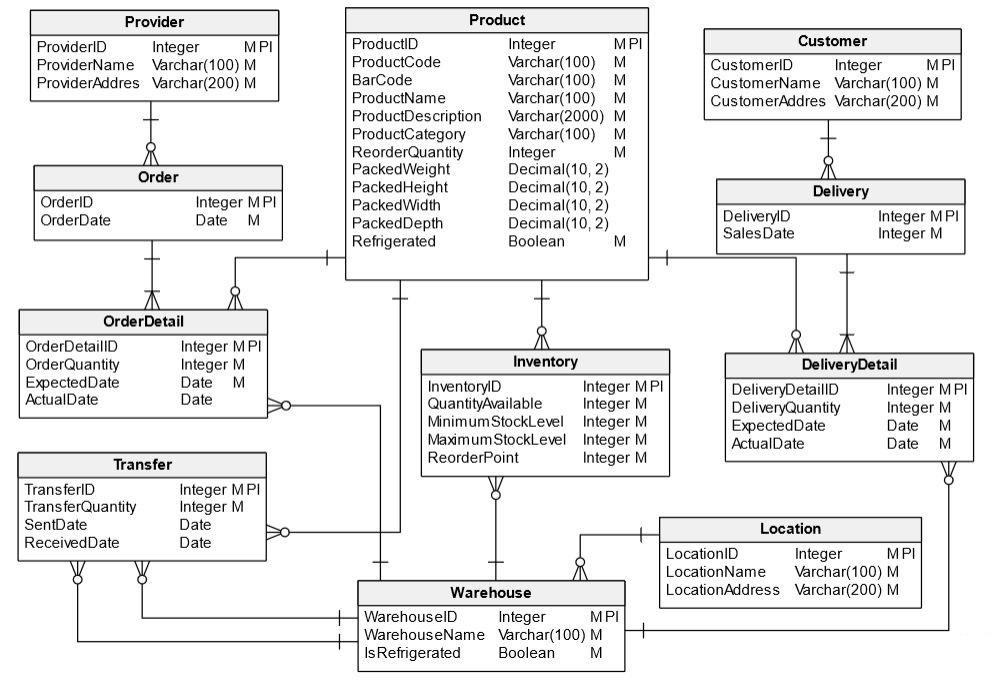
And now we have finished defining all the entities involved, as shown in the following diagram:
Relationships Between Entities
Defining the entities is just a part of creating a data model; it is not complete until we identify how those entities are related. Let’s analyze the relationships one by one:
Provider – Order
Each Order in our system is assigned to a Provider, but not all providers may have orders. We need to establish a 1:N (one-to-many) relationship between the two tables, with N being 0, 1, or more.
To achieve this in Vertabelo, we need to select the Add 1:N Relationship button:

Then we click on the Provider entity, and – keeping the mouse button pressed – move the mouse over the Order entity and release the button. The two entities are now related:
If we click on the relationship (the line in the diagram) we can see the Relationship Properties panel on the right side of the screen. This is where we can define the type (one-to-one (1:1), one-to-many(1:N)) and cardinality of the relationship, as shown below:
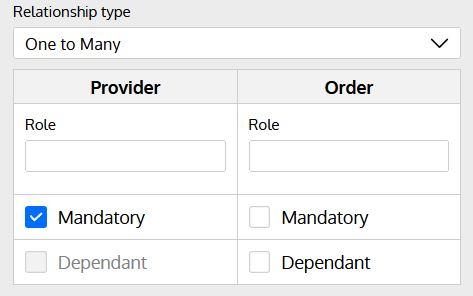
Selecting “Mandatory” on the Provider side means that each Order must have a Provider assigned.
Order – OrderDetail
This is a classic 1:N relationship between two entities, with N being 1 or more since there cannot be orders without at least one OrderDetail.
Customer – Delivery
Each Delivery in our system is assigned to a Customer, but not all customers may have deliveries. We need to establish a 1:N relationship between the two tables where N is 0, 1, or more.
Delivery – DeliveryDetail
Another example of a classic 1:N relationship. Each Delivery must have at least one DeliveryDetail, and each detail belongs to one and only one Delivery.
Location – Warehouse
Each Location can have one or more Warehouses, so we need to define this as a 1:N relationship. Both sides are mandatory, since it is illogical to have a Location without a Warehouse and vice versa.
Product – OrderDetail
This is a 1:N relationship, where each OrderDetail must have an associated Product and each Product may be included in 0, 1, or many Orders.
Product – DeliveryDetail
This is a 1:N relationship, where each DeliveryDetail must have an associated Product and each Product may be included in 0, 1, or many DeliveryDetails.
Warehouse – OrderDetail
Another 1:N relationship, where each OrderDetail is associated with a Warehouse and each Warehouse can have 0, 1, or many OrderDetails.
Warehouse – DeliveryDetail
Another 1:N relationship, where each DeliveryDetail is associated with a Warehouse, and each Warehouse can have 0, 1, or many DeliveryDetails.
Product – Inventory
This is a 1:N relationship, since each Product may have stock in 0, 1 or many warehouses, represented here as Inventory. We need to remember that Inventory is an intermediate entity created to resolve a many-to-many relationship between Products and Warehouses.
Warehouse – Inventory.
This is a 1:N relationship, since each Warehouse may store 0, 1, or many products (represented here as Inventory).
Product – Transfer
This is another 1:N relationship, since each Product may appear in 0, 1, or many transfers, and each Transfer consists of one and only one Product.
Warehouse – Transfer
This is a tricky relationship, since there are actually two relationships between these two entities. Each Transfer is related to:
- A “source”
Warehouse. This is the warehouse where the products were originally - A “destination”
Warehouse. This is the warehouse where the products are being transferred.
In this case, we need to create two 1:N relationships between the entities.
Our Final Model
Now that we have completed all the relationships, we have the final database model for an Inventory Management System:
Database Design Next Steps
In this article, we created an ER diagram for an inventory management system. Using Vertabelo, we can easily transform it to a physical model (which includes database-specific information) and then automatically generate the DDL script to build the database. You can learn about these two processes in the following articles:
- How to Generate a Physical Diagram from a Logical Diagram in Vertabelo
- How to Generate a SQL DDL Script in Vertabelo
If you have found this article useful but need to create a data model for other business requirements, check out here to Find Database Schema Examples or search for other solutions across all the example ER diagram walkthroughs available in this blog!
